

How to make a brass HO scale Hea Ibeam.
This is a step by step illustrated tutorial with detailed instructions.
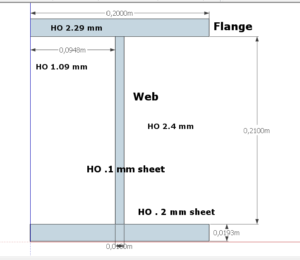 This image shows the 1/1 dimensions with added HO scale dimensions.
Make Jigs
Taking care to make accurate jigs results in a fine looking product.
Sand a piece of hardwood to 1.09 mm thick. I use a coffee stick.
Sand another to the same thickness. Cut two pieces 2.4 cm wide. Call these web jigs.

This is a soldering jig that I use. It it made from two pieces of ceramic tile. One tile is the base. The second is cut and two strips are glued to the base.
The strips are filed smooth and the strips joined at a right angle.
Cut Brass
Cut two strips of .2mm thick brass 2.3 cm wide. These will be used for the flanges.
Cut one strip of .1 mm thick brass 2.4 cm wide. This will be used for the web.
TIP – While you are cutting, cut as many pieces as you will need to make all the beams that you will need for your current project. I add 10% to make up for errors.
Solder Joints
Clean each of the strips with scotch brite.
Set a flange against vertical surface and hold in place with the wide jig. Fix the wide jig solidly. Shown is the setup on a ceramic jig with a clamp used to hold the wide jig solidly in place.
Place the web on the wide jig.
Now place a web jig on the wide jig. Use this to hold the web down and allow you to position the web solidly against the flange.
I use wire solder with a fine soldering iron tip.
Flux the joint. I use DIY liquid resin flux and apply it directly to the joint using a syringe as an applicator. Read about that flux here. CCCCC
Heat a spot in the joint with the tip. Then apply solder to the heated joint. Move the tip along the joint heating and applying solder. Apply as little solder as possible.
When the joint is made, clean your work and work with alcohol.
Place the second flange against the vertical surface held in place with a web jig piece under it. Flux the joint.
Place the second web jig on the top.
Hold everything solidly in place and solder.
Finishing
Polish using a fine brass wheel or buffing wheel with polishing compound.
If there are high spots, remove them with dental picks and/or hobby knives.
Below are other tutorials on soldering.Below are other tutorials on soldering.
Soldering Tutorials
How To Make Scale Model HEA Ibeam – This is a step by step tutorial that shows you everything from making jigs to final solder cleanup.

How To Use Resin Flux – A versatile flux that is inexpensive and very effective as a soldering aid.

Diy Solder Flux – Video –
This flux is extremely nice to use. It does not even require you to thoroughly clean the surface of the metal.
Coat your PCB or other boards with it and let them dry. No need to use any other flux thereafter.
How To Choose Solder – Answers the questions for modelers, “What solder should I use?”.

How To Make Brass I Beams – A tutorial page showing how to make brass I beams using two different methods.
How To Solder Brass – Tips, hints and tutorials on soldering brass, PCB, Vero Board and processor boards.


How To Make Door Handles – Shows you how to make a multi-purpose bending tool used to make door handles and more.

How To Shear Brass – This is basic to modeling in brass.

How To Make A Third Hand Useful – Your entire soldering experience will change if you do what is shown in this page. It is best to click on the image and watch the video.