

Instructions on how to add background sounds related to a building.
All buildings have their own sound profiles. For example workshops and factories will likely have a machinery and other sound profile. Office and residential buildings may have one related to human activity. That might even include automobile noises.
This board combines light activity with sounds related to whether lights are on or off.
Uses
An Arduino board that plays background sounds with a light display can be used in various creative and practical applications.
- Play songs and carols while lights in your village flicker on and off.
- Add factory and building sound profiles.
- Create an interactive art piece that combines visual and auditory elements to engage and captivate viewers.
- Enhance the ambiance in a room by synchronizing the light display and sound to create different moods and atmospheres.
- Design a device that plays soothing sounds and displays calming lights to aid relaxation and stress reduction.
- Wake up to a combination of soothing sounds and gradually increasing light intensity for a more gentle start to your day.
- Develop an educational tool that uses the combination of sound and light to teach concepts in a fun and engaging way, such as color mixing or music theory.
- Create a visualizer that synchronizes LED lights and sound to enhance the music-listening experience.
- Design a gaming accessory that adds an extra layer of immersion to video games by providing dynamic lighting and sound effects.
- Use the device to set the mood at parties, syncing lights and music to create an exciting and dynamic atmosphere.
- Enhance your holiday decorations with a device that plays seasonal tunes and displays corresponding light patterns.
- Use the lights and sounds to indicate environmental conditions, such as air quality or temperature, creating a sensory feedback system.
- Incorporate the Arduino into a theatrical production as a prop that provides sound effects and lighting cues.
- Build a custom musical instrument that combines light and sound to produce unique and innovative music.
- Develop a safety system that combines alarms and visual signals for emergency situations.
- Create a tool for physical therapy or rehabilitation that uses lights and sounds to guide and motivate patients through exercises.
- Enhance museum exhibits or trade show displays by adding an interactive element that engages visitors with lights and background sounds.
- Integrate the Arduino into your smart home system to provide feedback or alerts with lights and sounds.
- Develop an assistive technology device that uses visual and auditory cues to help individuals with visual or hearing impairments.
- Create a system that monitors and interacts with your pets or plants, providing feedback through lights and sounds.
- Design a cocktail mixer that lights up and plays music as it prepares drinks, making the process more entertaining.
- Use the device for interactive advertising and promotional campaigns to draw attention to products or services.
These are just a few examples of the many potential uses for an Arduino board that combines background sounds with a light display. The versatility and flexibility of Arduino make it a great platform for creative and practical projects.
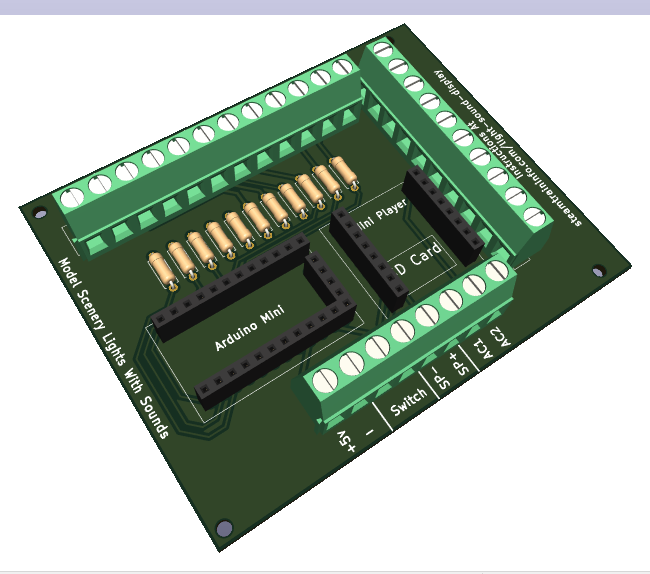
 The system is based on an auto starting mini mp3 player and an Arduino Mini micro controller. In this application there are provisions for 11 LEDs to light and for sounds to be played.
Materials Required
Circuit Board
270 ohm resistors 11
Arduino mini pro 1
DfPlayer mini 1
2 pin screw terminals 14
Speaker 5 Ohm 1
Sd card 32 GB 1
Pin headers 2
Dupont pin sockets 2
Get All The Parts Here
Assembly
 All that you have to do is insert the elements in the proper holes and make simple solder joint to fix them in place.
The screw terminals can be joined Using the slots on the sides. Join the 2 3pin Screw Terminals so that you have a terminal strip of the right length.
Insert the Screw Terminal Pins into the board and solder them in place.
The Player pins get inserted into the Dupont Pin Sockets. So you must cut the pin sockets to a length that matches the number of pins on the Player. That is 8 pins.
As an aid to keeping them vertical in relation to the circuit board, insert the player pins into the pin sockets. Solder the pin sockets in place.
Be sure that the slot for the SD card is oriented just as you see in the image.
Now you are ready to make the external connections.
There are connections for 11 LEDs. Each is numbered. On each side of the number there are letters, C and A. The LED cathode connects to C and the LED anode connects to A.
Connect 5 v DC power to +5v and GND. Do that via a switch or another Arduino board. When the unit is powered up it automatically starts playing.
You can see how that is done with another Arduino board here.
RX and TX are connection using Bluetooth. How to use a Bluetooth speaker with a DFPlayer mini is here.
ACC1 and ACC2 output +5v when the player is running. They are used to start other accessories when the unit is powered up.
S+ and S- go the the + and – connections on your speaker, respectively.
Speakers

In practice, the S+/S-set can be used for stereo,. This image shows wiring for stereo.
Speakers must be 3 Watt or less.
Amplifier
3 Watt 8 Ohm speakers should give you plenty of volume. If you want more, use a 5 volt amplifier. How to do that is here.
Operation
The Arduino Mini is loaded with a program that starts playing audio after the lights go bright.
As an add on, if you wish night sounds when the lights turn off, connect another arduino board to one of the ACC connections and program it to play audio when the lights go off.
Load your sounds on the SD card using the procedure here.
When loading sounds on your player, you may wish to mix various sound tracks using a program like Audacity. How to use Audacity is here. HHHH
Insert the card firmly into the slot.
With that done, every time the unit is powered up, it will play the sounds.
To control the animation, connect an external switch to your power supply.
Feedback
If need any information, have comments, or have questions, please use this spam free form.