

How to scratch build model railroad signal lights.
a detailed, step-by-step guide for creating Ho/OO scale 2 and 3 aspect signal lights from scratch. This comprehensive tutorial includes prototype plans, sturdy brass construction tips, and options for using 4mm scavenged Christmas lights, 5mm standard LEDs, or SMD LEDs. Learn how to hand cut brass sheets, assemble signal light faces, and create hoods using black shrink tubes. With prototype length details and a ladder jig for efficiency, this guide ensures a rewarding model railroad signal light construction experience.
Features
- Two and three aspect signal lights
- Results in Scratchbuilt models of prototype 2 and 3 aspect signal lights
- Prototype plans provided
- Sturdy brass construction
- Suitable for Ho and OO scales
- Use 4 mm scavenged Christmas lights or 5mm standard LEDs or SMD Leds.
- Complete, step-by-step instructions follow.
HO Scale Signal Light Schematic
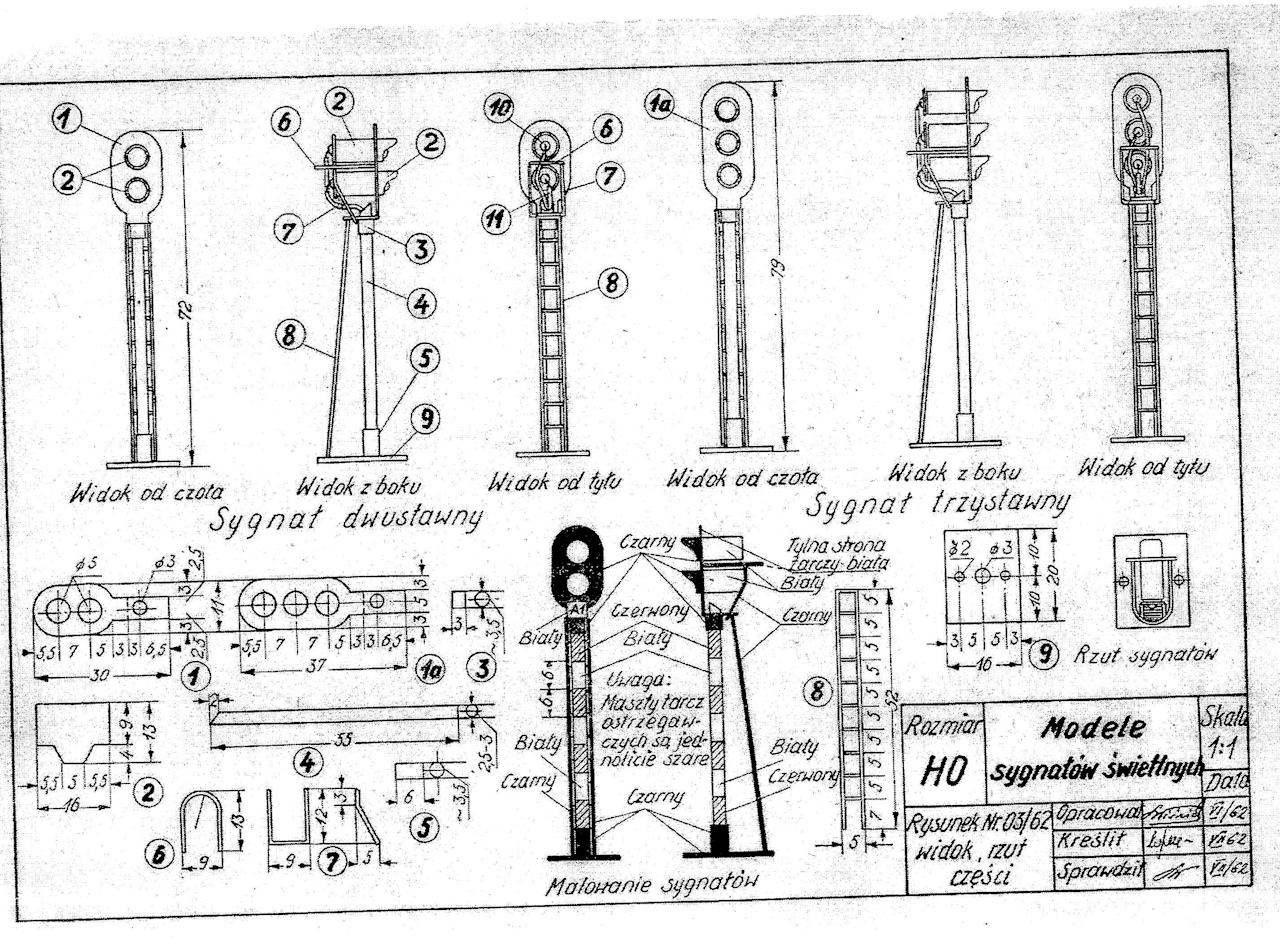
The image to the left is scale drawing of 2 and 3 aspect signal lights.
For best results, click on this image and print.
Credit this image to Bogdan Pokropinski.
The Signal Light Face
You can either cut and drill the face or etch it. If you know how to etch, you can make extremely accurate pieces. Hand cutting can be less accurate, but from a modeler’s perspective, the differences can be hardly noticeable.
This is the procedure for hand cutting the brass.
Cut .3 mm flat brass sheet mmm wide.
Mark centers for the lights and wire hole.
Scribe the fold and top and bottom cut lines.
Lightly center punch the light centers and wire hole so that you can precisely place a drill tip.
Drill with a step drill to the mmmm mark. See this video that shows how to drill brass sheet with a step drill. BBBBBB
File smooth any raised hole edges on the front and back of the face.
Cut each signal face to the proper shape .
Fold
The Lights
We use 4mm LEDs scavenged from Christmas light strings (You can also use 5mm or SMD LEDs. You will have adjust the hole and hood sizes.)
Bend wires flat against base of LED and cut flush with side of LED.
Prepare FINE magnet wire. Cut to MMMM and remove insulation. This video shows the procedure. VVVVVVV
Solder FINE magnet wire to each of the LED wires. Insulate with a liquid insulator.
The Hood
There are two ways to make the light hood. The easiest is to use a piece of black shrink tube. Alternatively file and cut brass tube to shape.
I will proceed using shrink tube.
Check the fit of the shrink tube and LEDs in the drilled holes. Use a fine file to trim any edges.
The Mast
The mast will be cut so that it can be inserted into the model base.
According tot the plan, prototype length is MMMM. I will cut it to MMMM
The Base
Make the base from .5 or .6 brass sheet.
A hole the size of the diameter of mast must be centered in the base.
The Ladder
Since one can be expected to make quite a few lights, it is best to make a jig.
This image shows a ladder jig.
From the drawing, the rails are ooo and the rungs are mmmm.
Assembly
Solder the face to the mast. The face base should sit on top of the mast, in other words, the mast should not pass through the wire hole.
Solder the mast to the base.
Pass the LED wires through the wire hole. So that you know which wires are associated with each led, insert each into set into shrink tube.
Resources
Here are some pictures of prototypes.
[Best_Wordpress_Gallery id=”7″ gal_title=”BLOCK SIGNALS”]
MyModel Railroad – Excellent signal light construction
Feedback
Your questions and comments help us clarify and upgrade the information presented. Even if you find this helpful, please tell us.
Please let us know if this page has been helpful And if you have questions or suggestions, use this spam free system.
Or use the green WhatsApp button that is to the right.