

What’s In This Page
How to calculate led current for any resistor value using a simple prototype board setup.
If you are using a phone, at the bottom of the page there are links to many supplies for modelers. Otherwise those links are in the sidebar to the right. You can also find other information by using the search function that is in the navigation bar above.
Also In Addition To What’s In This Page, What This Site Can Do For You
If you are a model train enthusiast, modeler, diorama maker, or interested in making Arduino projects the easy way, there is categorized information for you here. Click Here.
The Latest Information
Anything new and page updates are posted on X (formerly Twitter), Rumble and Facebook.
It is easy to keep up with the latest by following us on either of them.
Free Help
If you have questions, comments or need help with this ,or any other project, or animating your own diorama or train layout scene, either go to our Free Help page click on the button to the right.
How It Works
This method of calculation gives you the exact current passing through your LED for any resistor value. You are sure to not burn out the LED or your Arduino.
 This is a simple tool that you should keep handy to be sure that your circuits are properly made.
You are never really sure about the characteristics of the LED you get even if a data sheet comes with them. So the best thing to do is measure.
You can estimate using an LED OHMS law calculator. One is Here.
Even though I received some SMD LEDs with the parameters 2.8v-3.4v, AC or DC compatible, Forward current 15 ma typ/20ma max I check to see the actual numbers using my power supply
As an Arduino user I must always be concerned about not exceeding the board power limits. So when adding multiple LEDs to a board, I also check.
For example, I have a traffic light animation going into one of my layouts. There are 24 LEDS. Without a resistor they pass about 20 ma when powered with 3 volts. But the Arduino Mega uses 5 volts. So I need to measure amperage with resistors between 500 and 1000 ohms.
The Board
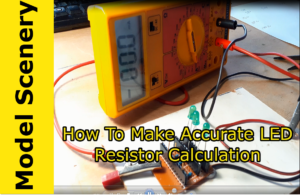
The simple board shown here makes this process fast and easy Watch the video on the left to see how easy it is.
It consists of a resistors of different value mount on a piece of prototype board. LEDS are then put on the board.
Using the voltage you have chosen, (In my example, 5 volts), move across the board and measure the current passing through each resistor/LED.
Record the data for that batch of LEDs.
In my case, 560 ohms gave 6.0 ma and 1k gave 3.4 ma.
Using either will keep the Mega safe. The smaller will give a brighter LED. So that is my choice.
Materials Required
prototype board –vero board is recommended
3 pieces of 2.54mm One Row Female PCB Socket Board Strip
Assembling the board is very easy.

The image to the left shows you the connections if you use perf board.
If you use the vero board, the soldering processes is much easier but the connections are the same.

To the left you see it as it is used.
The negative is hooked directly to the negative lead on your power supply.
Connect power to the board through your amp meter. The video shows how to measure by moving from LED to LED.
Free Help
If you have questions, comments or need help with this ,or any other project, or animating your own diorama or train layout scene, either go to our Free Help page click on the button to the right.