

What’s In This Page
This is a directory page with information related to operating retro trains, operating narrow gauge train lines and train museums. There are also selected video insertions.
If you are using a phone, at the bottom of the page there are links to many supplies for modelers. Otherwise those links are in the sidebar to the right. You can also find other information by using the search function that is in the navigation bar above.
Also In Addition To What’s In This Page, What This Site Can Do For You
If you are a model train enthusiast, modeler, diorama maker, or interested in making Arduino projects the easy way, there is categorized information for you here. Click Here.
The Latest Information
Anything new and page updates are posted on Twitter (now X) and Facebook.
It is easy to keep up with the latest by following us on either of them.
A tutorial for making circuit using a circuit board that will provide versatility as well as save you time and labor.
What Is An Event Timer
An event timer is a 24 hour clock that tells up to 17 external functions to start and stop at given times of the day.
You compress the 24 hours to your own elapsed time. For example for the purposes of your diorama you can set a diorama 24 hour period to be 30 (or other time that you choose) minutes.
It controls the colors displayed on an ws2812b led pixel strip and the programs on up to 17 external arduino boards.
So what can you do with it?
Turn lights (randomly, sequentially, or simultaneously) in buildings on and off.
Turn street lights (either slowly fade or immediately) on and off.
Make continuous running lights for signs or of all sorts.
Play sounds on mp3 players that start on stop in coordination with lights installed in buildings or simply as general background sounds.
Use a Pixel led strip to project a dawn to sunset (or other) light show.
Use individual pixel leds to light buildings with different colors.
Add a fantastic 3 flash timed thunderstorm.
Turn lights and appliances (115v, 220v or other) around your home on and off. With lights turning on and off, you can make your home look occupied even when you are away.
Description Of A Circuit Board That You Can Use To Make An Event Timer

The event timer can be made using an easy to assemble kit.
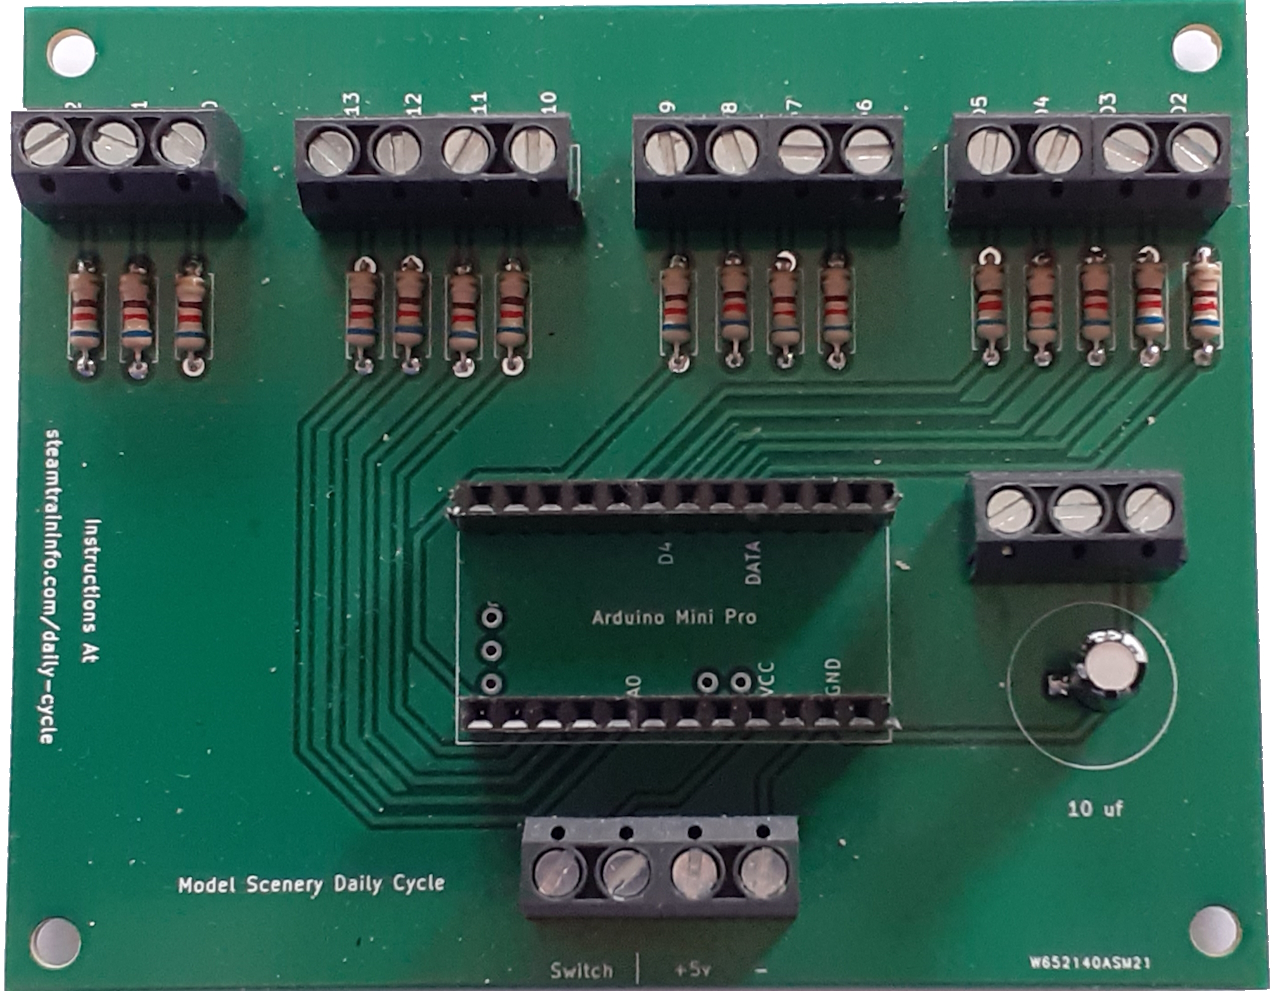
The an image of the circuit board itself is to the left. All that you have to do is insert the included part into the holes that you see in the board and make simple solder connection on the back side of the board.
The board is clearly annotated so that you know exactly where to place the parts.
The board comes to you fully programmed with an example set of events timed. The code is flexible and adaptable to your needs and desires.
And a full step by step guide is here.
 This is what the finished event timer looks like.
Note that all connections are made via screw terminals.
The Arduino mini is not connected directly to the terminal board. It connects via DuPont pin sockets.
Using pin sockets for connection makes it easy for you to remove the Mini for programming or any other reason.

This event timer comes to you as a DIY kit to be assembled according to the directions provided with the.
Note that at any FTD programmer is included so that you can schedule the events as you wish.
How to use that programmer and make changes is also included in the instructions.
You can get the kit here.
Features
- Control up to 17 functions.
- You set the start and stop time for each function.
- The board connects to external function controllers via 270 ohm resistors that ensure a proper function controller activation sequence
- Each connection controls a specific function controller.
- The system program is housed on an Arduino Mini.
- The Arduino Mini comes to you with a basic 24 hour real time cycle. You can adjust that to last as long as you wish in real time. Instructions are here.
- All this is covered in the free instruction manual that comes with the board.
Video Demonstrations
These videos show how this works in two of my dioramas.
Simple Animation
 This video shows you a rather simple application of this event timer. You’ll see lights cycle on and off and track lights etc. fade in and fade out.
Click on the image watch the show.
Impressive Animation
 This shows you what you can do if you really take the time with this and make a diorama that is truly impressive.
Click on the image watch the show.
Operation
Connect a 5 volt power supply. And SPST switch where indicated.
When power is applied to the event timer it starts through its loop. It will loop through the 24 hour cycle.
Remember to adjust that 24 hour cycle to the time you wish it to operate in real time. That is in the instructions.
This cycle will repeat as long as power is applied to the event timer.
Feedback
Please let us know if this page has been helpful And if you have questions or suggestions, use this spam free system.