

How To Control Four Fast Led Programs Using A Switch Or External Toggle
What’s In This Page
How to control ws2812 led strip using a switch or toggled input.
If you are using a phone, at the bottom of the page there are links to many supplies for modelers. Otherwise those links are in the sidebar to the right. You can also find other information by using the search function that is in the navigation bar above.
Also In Addition To What’s In This Page, What This Site Can Do For You
If you are a model train enthusiast, modeler, diorama maker, or interested in making Arduino projects the easy way, there is categorized information for you here. Click Here.
The Controller
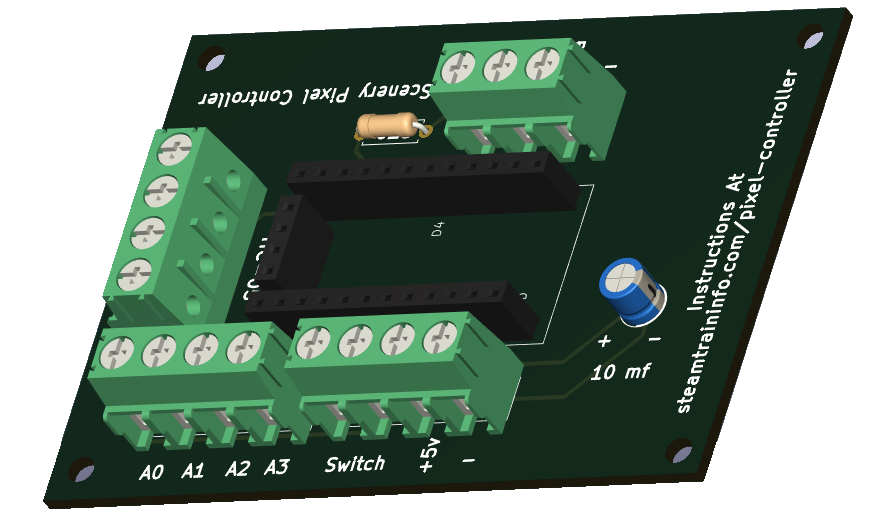
This is the led controller board that we will use. It comes as a DIY kit that you can get here.
It consists of a circuit board, DuPont pin headers, an Arduino Mini Pro microcontroller, a 10 uf surge suppressing capacitor, screw terminals, a gate resistor for the pixel led strip, a 1 meter ws2812 led strip with 60 pixel leds and an FTDI programmer.
Included is a copy of the control program that is on on the microcontroller.
One of the banks of screw terminals can be used to optionally attach an Hc-05 data receiver for remote control of the programs. How that is done is described in this page.
One part of the the large screw terminal bank is used to power the board. Provisions for a switch are included.
On the other part of the large screw terminal bank are four connections that are used to toggle the individual programs on and off.
The LED strip is connected to a to the third screw terminal bank.
The led is powered directly from the power source (with a capacitor in the circuit) so that you can use as many pixel strips as you want with9ut burning out the Arduino Board.
The Arduino board uses 5 volt regulated power.
Changing The Program
The Arduino is programmed for 60 pixels.
You can change the number of pixels and the programs on the board using ChatGpt
To change the FastLed program, go here and pick a program. Click.
Once you have it, tell Chatgpt to change the sketch.
This is how it is done. Video demonstrations are included. Click Done
Feedback
Your questions and comments help us clarify and upgrade the information presented. Even if you find this helpful, please tell us.
Please let us know if this page has been helpful And if you have questions or suggestions, use this spam free system.
Or use the green WhatsApp button that is to the right.