


How To Make A Static Grass Applicator
On A Budget
What’s In This Page
This page shows you how to build a budget static grass applicator that will perform better than most other commercial static grass applicators that you find on the market. Built on a budget it may be, but powerful and versatile it is.
If you are using a phone, at the bottom of the page there are links to many supplies for modelers. Otherwise those links are in the sidebar to the right. You can also find other information by using the search function that is in the navigation bar above.
The Latest Information
Anything new and page updates are posted on Twitter (now X) and Facebook.
It is easy to keep up with the latest by following us on either of them.
The Project
 The image shows the static grass applicator that I made following this procedure. It is one of my favorite units.
It can be powered with anything from 4 ½ V DC to 12 V DC. My preference is to use a 9 V DC battery. If you watch the video linked at the end of this paragraph, you will notice that the pulling power difference between 12 V DC and 9 V DC is minimal. With the battery I have a portable unit and, when I work, I am not tied to a wall outlet, and am not bothered by extraneous wires that can catch on anything in my scenery.
As shown, it is as simple as it can be. You can spin off this and put the electronics in a box of your choice.
Save Time
 You can download these complete instructions in .pdf format so that you can work at your pace without having to come back to the web. The download it free. To get it, click here.
Video Demonstration
This video shows how to make it and how it operates after you make it. To watch it, click here.
Type Static Grass Applicator
Because of its versatility, we will build an external dispenser type static grass applicator. You can read about what is shown above and read about the various types and their comparative advantages here.
This is a simplified construction that emphasizes cost over aesthetics. If you just want something cheap, it is a great choice. And, if you are not going to use it that often, why spend a lot of money..
If it will be used in an environment where more than one are required or it is likely to vanish, it an excellent choice.
As an aside, even though I have and sell other more expensive styles, I usually use one of these.
Key Features
1. Powerful 15 kv DC Static Field Generator: Experience the superior performance of our static grass applicator, surpassing many expensive commercial options on the market.
2. Easy Assembly: With no special tools required, you can assemble your static grass applicator in just 30 minutes.
3. Adjustable Voltage Control: Fine-tune your grass laying experience with a unique variable input to output voltage control, allowing operation at voltages as low as 7.5 kv DC.
4. Safe and Convenient Power Options: Operates on a 12v DC input, eliminating the need for 110 or 220v power sources. Choose between battery or wall-wart power for ultimate portability and flexibility.
5. European Union Certified Electronics: Rest assured knowing that our kit meets the highest safety standards.
6. Compatible with Various Static Grass Up To 16 mm
Parts Common To This Type Static Grass Applicator
Those things listed here are all that are used in a static grass applicator.
The heart is the static field generator. We will be using one that generates a 15 kv DC static field. Read about it here.
The Parts List
- static field generator
- female barrel jack connector
- plastic switch
- two sets of banana clip connectors
- Wago clip
- Wire terminal connectors
- Shrink tube
Collecting the parts
We have assembled all those parts plus a few more in kit form.
We recommend that you use those parts. Simply stated, the static field generator is unique and powerful. All the other parts are assembled in accordance with European Union standards.
With these parts, the assembled unit is safe and operates without problems.
Assembling The Budget Static Grass Applicator
The parts are all attached to a mounting plate.
 I used some scrap MDF.
 And then I dressed it up.
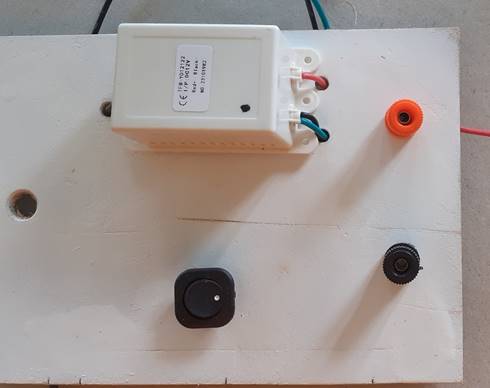
I spray painted it white and drilled holes for the parts. This image shows the location and size of the holes that must be drilled through it.
 The wires from the static field generator go through the MDF. You might consider using a couple touches of hot glue to hold them in place.
 The switch has a tab that for which you must cut a bit out of the side of the MDF for it to go in place.
 Attach the female banana clip connectors.
 There are three clips on the female barrel jack connector.
Remove the one shown in the image.
 Attach a piece of red and black wire to the pins on the female barrel jack connector. Check the polarity. (If you wire the pins backwards you will burn out the generator.)
Once you are sure that the polarity is correct, cover the connections with the shrink tube.
 Insert it into the mounting plate and tighten.
 Connecting The Wires
This is the look of the underside of the applicator.
Wires have been trimmed. The size of your mounting plate and placement of the components will determine how much you trim them.
Wire end terminals have been soldered in place.
The thin black wire from the generator connects to the black wire on the female barrel jack connector via the Wago clip.
The red wires connect through the switch.
Styrofoam bottom rails provide stability and room for the wiring.
And when all the connections have been made, this is what you should see.
CAUTION
Do Not Check Voltage or Continuity On The Output Side
Do No Check Voltage or Continuity On The Input Side
Do Not Connect Anything Across Either Of The Connection On The Input Or Output Sides. That Includes An LED!
Do Not Use A Switch That Has Metal Parts.
Why? If you violate these cautions, you will burn out your generator.
Using The Applicator
Power
It can be powered with any DC power supply with a voltage rating of 4.5 volts DC to 12 volts DC. Since the generator is not a transformer, but more like a capacitor, the current rating is no problem. Ratings of .5 to 2 amps have been shown to work well.
You can read full information about the generator here.
Grass Dispenser
Because this is an external dispenser type grass applicator, you can use almost anything. I have a complete review of many that you can use here.
My Favorite Configuration
 I power the applicator with a 9v DC battery and use either a tea strainer or vegetable strainer dispenser.
Using a battery has the following advantages:
- There are no wires to catch on anything in my scenery.
- I am not dependent on being close to a wall outlet or power supply.
- It is convenient to move around the scene work area.
Feedback
Your questions and comments help us clarify and upgrade the information presented. Even if you find this helpful, please tell us.
Please let us know if this page has been helpful And if you have questions or suggestions, use this spam free system.
Or use the green WhatsApp button that is to the right.