

How To Make And Use A ws2812 Pixel Led Controller
What’s In This Page
How to make and use a ws2812 pixel controller including access to programs and apps for controlling the LED strips.
If you are using a phone, at the bottom of the page there are links to many supplies for modelers. Otherwise those links are in the sidebar to the right. You can also find other information by using the search function that is in the navigation bar above.
Also In Addition To What’s In This Page, What This Site Can Do For You
If you are a model train enthusiast, modeler, diorama maker, or interested in making Arduino projects the easy way, there is categorized information for you here. Click Here.
Features Of The Pixel Controller
- Allows for control of ws2812 remotely using android devices.
- The ws2812 is directly powered by the controller board so the number pixels controlled can be extensive.
- Will control multiple FastLed programs.
- Can be auto started when powered up.
- Can be switch controlled.
- All control programs and apps free.
- Designed to make controlling FASTLED with WS2812b led strips fast and easy.
- Comes preloaded with FASTLED Rainbow program on the Arduino board.
- FTDI programmer included so you can load the FASTLED program of your choice.
- Optionally start and stop the program using the power switch connections.
- A capacitor protects the LED strip from damage due to power surges.
- Easy to assemble
The Controller
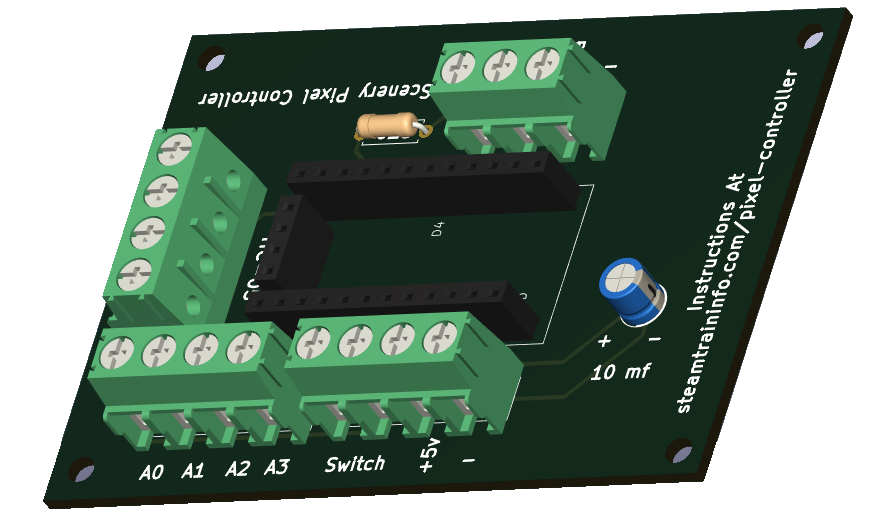 The Pixel Strip connects to a special screw terminal. That terminal is connected directly, via a capcitor, to the board power. That allows for the addition of a large number of leds without overpowering the controller.
A special set of screw terminals allows for the addition of an HC-05 data receiver module so that the pixel strip can be controlled from a phone or tablet.
There are four analog input connections so that different color display programs can be triggered by an external device. All are protected by dropdown resistors to prevent the analog pins from floating and causing spurious program activation.
The power connections are set up so that the program can either autostart or be started with a switch.
Get the board and parts here.
Use
The Led strip is connect via its designated screw terminal.
For remote control, connect the HC-05 to its designated screw terminal.
There are screw terminals for a switch. You can use that to start the program via the switch.
You can also bypass the switch and have the program start as soon as the board is powered up.
There are four connections labeled A0 to A3. The connections allow you to start individual programs when they are toggle high. Dropdown resistors ensure that they to not float and sporadically start programs in error.
Programs that you can use are below.
Assembly Process
All connections between parts are made via traces on the circuit board.
The circuit board shows exactly where the elements are placed on the board,
So it is a simple matter of inserting the parts, soldering them in place with a fine point soldering tip on which there is a minuscule drop of solder and finally trimming off any protruding wires or pins to a comfortable length.
The screw terminals come as 2 pin units. They are designed to be joined by using the slots on each side. So, for example to make a 4 pin screw terminal, join two two pin terminals.
The pins on the DFPlayer and Arduino board connect to the circuit board via Dupont pin sockets. Cut the pin sockets to length and insert the pins into the sockets.
The sockets will be soldered to the circuit board. With the pins or the DFPlayer and and Arduino board inserted, you can be sure that the pin sockets will be vertical when soldered to the board.
Now add all the elements to the board and solder in place.
The Arduino fully programmed. There are other programs that will you different displays.
Programs And Apps
This page gives you everything you need from programs to tutorials. Click here.
Feedback
Your questions and comments help us clarify and upgrade the information presented. Even if you find this helpful, please tell us.
Please let us know if this page has been helpful And if you have questions or suggestions, use this spam free system.
Or use the green WhatsApp button that is to the right.